How to Capture Astrophotography by Erin Harrigan
Have you ever looked up at the sky and wondered what it would look like if it were raining stars? I have always been fascinated by all things that sparkle at night. . . lightning bugs, thunderstorms, fireworks, and especially STARS. Now I enjoy capturing them in my photography.
If you are new to astrophotography or simply looking for some ways to get creative with it, here are a few tips that to help you get started!
Planning
One of the biggest factors that will contribute to your astrophotography success is planning. This part might not be the most exciting, but it can save you from a lot of frustration. Consider these things when you plan your shoot—
- Light Pollution: You want to eliminate as much light pollution as possible. This includes street lights, passing cars, etc. I am fortunate to live in a dark sky location, but a dark sky finder is a big help if you don't.
- Moon Phases: You may wish to keep an eye on the moon. If you're planning to photograph stars, a full moon will add a lot of unwanted light to the night sky. However, when the moon is very low on the horizon and not so bright, it can be a lot of fun to shoot! In general, though, you will want to plan most of your Astro shoots around a New Moon.
- Weather: One of the biggest challenges when planning a trip more than a couple of days in advance is the weather. Clear skies are ideal, but a few clouds may be fine, depending on what you plan to shoot. I love catching a distant/isolated thunderstorm or even some low fog.
- Composition/Location: I prefer to scout locations during the day whenever possible to factor in all of the surroundings and foreground elements to visualize my composition easily. You will also need to know exactly where the stars will be. I have a couple of apps on my phone that I find very helpful: Sky Guide and Sun Surveyor. Photo Pills is another one that many photographers use.
- Night Safety: Many dark sky spots are in remote areas, so it's important to be prepared with things like a map, compass, headlight, flashlight, extra clothing, batteries, snack, hand warmers, etc.
Nikon D3300, Tokina 11-16mm
Equipment
- Camera: Usa a camera with manual settings, ideally a DSLR or mirrorless. If you can afford it, a full-frame will provide better results because of the larger sensor. But if that's not in your budget, a crop sensor will undoubtedly get the job done.
- Camera Lens: "What is the best lens for night photography?" I see this question a lot. While that's partly an artistic choice, there are a few things you may want to consider… Wider lenses are very popular in night photography. They work well for larger landscapes and capture the vastness of the Milky Way. Mid-range and telephoto lenses are great for capturing more detail in your celestial subjects, the moon, and deep space photography.
- Tripod: You have to have one. Unless you are doing some deep space photography, you don't need anything fancy, just something that will hold your camera fairly steady will be fine. You will also want to turn off any vibration control while using a tripod.
- Remote Shutter Release: This helps prevent camera shake. Also, lock up your mirror if you can, as that also helps to reduce movement.
- Flashlight/Headlight: A headlamp is a great hands-free option. I also like to take a flashlight.
- Extra Batteries: It's always good to pack extras.
Shooting
- Focusing at Night: Adjust your camera and lenses to a manual setting. Place your lens's focus to infinity (to start). You may have to adjust slightly around infinity to find your lens's sweet spot. You can also use live view to zoom in and make sure that your focus is sharp on the stars. I usually look for the brightest star in the sky when setting my focus.
- Shoot in RAW: Shoot in RAW to preserve as much information and detail as possible. You will need it when editing.
- 500 Rule: The 500 rule is a mathematical formula to calculate the longest possible shutter speed you can use to avoid star trailing. 500 / (Focal Length) = Shutter speed time (in seconds). This is an excellent guide to go by for wide-angle lenses, but for mid-range and telephoto lenses, the resulting shutter speed may not be sufficient. In this instance, you may want to use a star tracking mount to avoid star trails.
- Stacking/ISO: While factoring in Shutter Speed and Aperture, you will also want to consider your ISO. A higher ISO setting makes your image brighter but can also add noise. One way to combat that is to stack your images. Stacking is just the process of taking several shots of the same thing and then importing them into a program like Deep Sky Stacker, where it will stack them into one image for you. You can use Photoshop and Lightroom to stack your star images, but the process is a bit more tedious.
If you aren't comfortable with the idea of stacking, you'll be happy to know that you can still have some great results with single exposures.
Editing
I primarily use Adobe Camera RAW & Photoshop to edit my astrophotography. If you are stacking images, you will import your stacked image into Photoshop (or the editing software of your choice) and proceed from there.
Nikon D750, Tamron 15-30mm
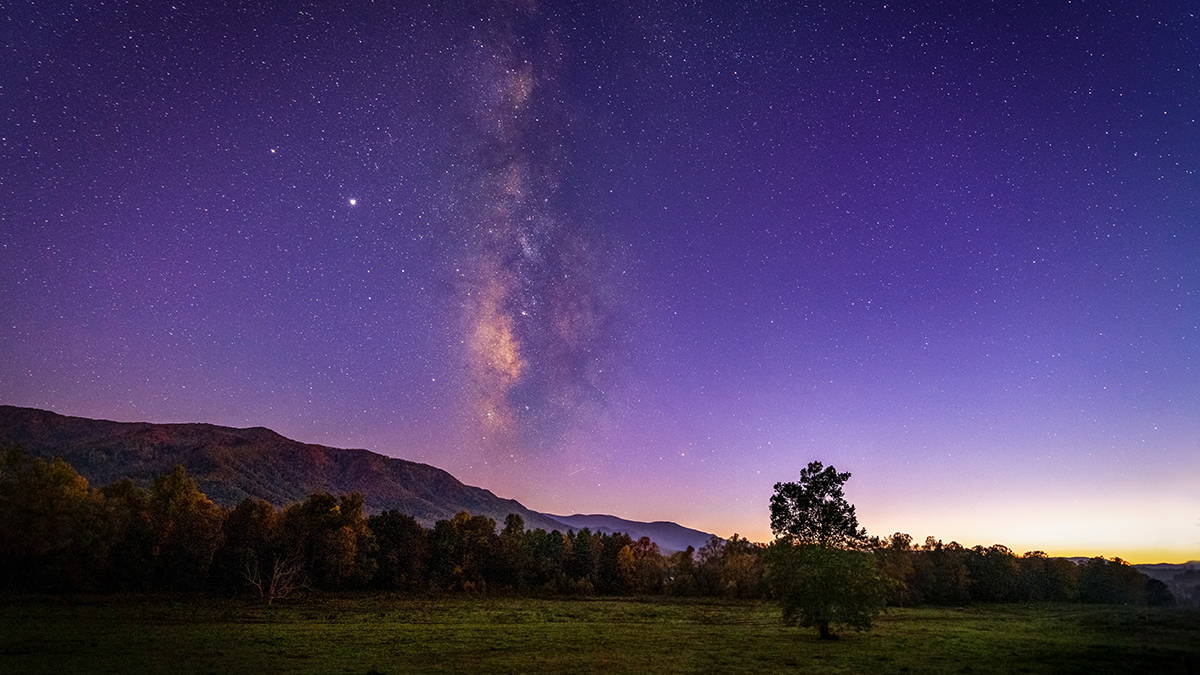
The Milky Way/Stargazing
For single exposure shots of the Milky Way (and the constellations in general), I usually start with settings that look something like this: 15mm f/2.8 25sec ISO 2500. These settings are just a starting point and can vary slightly by camera, lens and environment, so it's always good to take a few test shots.
I sometimes like to use my flashlight to quickly paint a bit of light onto the foreground while the shutter is open. In the image below, by flashing some light onto the hay bales, I was able to take them out of the shadows and incorporate them more into my composition.
Nikon D850, Tamron 15-30mm
"When photographing the moon... I prefer to plan for when I have some daylight or the moon is low on the horizon."
Shooting The Moon
One of my favorite things to photograph is the moon. Photographing the moon is a bit different than photographing the stars. Specific camera settings will differ based on the conditions you're shooting in, but there are some rules that you can follow to get you started.
As with the dark sky shots, I turn off my vibration control and lockup my mirror to help reduce vibration when using a tripod. The moon is VERY bright, so you may not be able to rely on your light meter in all situations. When photographing the moon with landscape or a foreground element, I prefer to plan for when I have some daylight or the moon is low on the horizon. I find that it makes balancing the exposure easier. My favorite lens for shooting the moon is my Tamron 150-600mm. I like to minimize the need for cropping as much as possible. If something like that isn't in your camera bag, try starting with the longest lens that you have.
Your settings for moon shots can vary a bit. The Looney 11 rule is a helpful place to start...
"For astronomical photos of the Moon's surface, set aperture to f/11 and shutter speed to the reciprocal of the ISO setting."
For example f/11 1/400 ISO 400. As with all photography rules, they're simply a guide. You may need to make adjustments based on your gear and conditions.
Here are a few of my moon shots…
Try Out Some of the Lenses Erin Uses For Her Photos
Getting Creative
I LOVE to experiment with my photography. For the nights when I want to let my imagination take over, I have some creative lenses and tools that I enjoy using. And the best part about it; these effects are all done in-camera!
For the images seen here, I used the Lensbaby optic swap system. I have the Composer Pro II and several interchangeable optics. The Composer Pro II can either stay fixed or tilt, allowing you to change your chosen optic's effect intensity and focus. These little guys are manual, lightweight, and versatile, so they're an easy addition that doesn't weigh me down or require a lot of adjusting once I'm set up! (which I appreciate when I am working in the dark.)
In this shot, I wanted my subject to stand out and the Milky Way to be the focus while the rest of the sky "rained" stars, so I chose the effect of the Sweet 35.
Lensbaby Sweet 35 | ISO 3200 | f3.5 | 25 sec | Nikon D750
The Edge 35 is one of my favorite optics, especially for night photography. I love combining the beautiful bokeh of twinkling stars alongside a sharp slice of focus. It's not something I can do with any of my other lenses
Lensbaby Edge 35 | ISO 3200 | f3.5 | 25 sec | Nikon D750
When photographing Comet Neowise, I chose the Edge 80 optic because I could achieve focus on the distant comet while letting the beautiful bokeh of the city lights below add a bit of color.
Lensbaby Edge 80 | ISO 3200 | f3.5 | 7 sec | Nikon D750
For this one, I wanted to add some color to an otherwise plain moon shot. With the afternoon summer sun shining just over my shoulder, I created this rainbow flare by placing the Lensbaby Omni wand in front of my telephoto lens.
Lensbaby OMNI Crystal Wand | Nikon D850, Tamron 150-600mm
Just Go Shoot
I have one fundamental rule when I'm out for some artistic astrophotography: creativity and fun over perfection! I hope you have found these tips/ideas helpful!
The Lyrids Meteor Shower is one of the oldest known meteor showers! It will peak on April 21-22, will you get out and capture it? 📸
Erin Harrigan
Erin is a fine art landscape and astrophotographer, based in the Shenandoah Valley of Virginia. She is drawn to both the energy of urban life and the calm of the coast.
"When I moved to the mountains a few years ago, I became so awestruck by the landscapes and the stars, that I was inspired to buy my first dslr camera. What has followed has been a wonderful, life changing journey of art and creativity. When my work is on display in art shows and events, others usually describe it with a feeling such as energizing, calming or even nostalgic, which for me, is a great compliment, showing that my work reflects my roots, inspirations and my love for the outdoors."
Instagram Facebook Website

Leave a comment
All comments are moderated before being published.
This site is protected by hCaptcha and the hCaptcha Privacy Policy and Terms of Service apply.